

|
|
|
|
 |

|
 |
BMW Garage | BMW Meets | Register | Search | Today's Posts | Mark Forums Read |
 |

|
BMW 3-Series (E90 E92) Forum
>
KnighTT e92 madness - Build thread.
|
 |
| 07-09-2019, 09:18 AM | #1 |
|
Captain
 
459
Rep 617
Posts |
KnighTT e92 madness - Build thread.
Time for a new build thread! I should have learned my lesson with my last N54 135i, but here we go again.
So, after scoring the entire east coast looking for a 335is, I struck out. I had my eye on 3 at the same dealership down in Tampa for around $16k. The salesmen were the first red flag, pulling out all the old BS lines. I wanted to strike a deal before I drove from Atlanta all the way down there. Turns out, they bought these things at full retail and then tired to upsell them at $20k thinking they were rare enough to make a profit on. Well, after 6mo, they still sat there. In any case, my bank decided it didn't want to finance them at only 2 years at over 50% down, so I passed. As I had been literally staying up until 1am for two weeks scoring every Facebook and Craigslist ad for the right car, I stumbled upon a 2010 335i 6spd. Now I had been looking for a 6spd but the 335is game is super rare with a manual so I had come to settle with the DCT. Having the chance to get a 6spd 335xi peaked my interest. Especially with the dark grey I had been looking for. Catch....163k miles. It was in town though, so I at least had to go look, immediately, and had cash.  Truth is, it was a bit dirty but turned out to be in better condition than I thought. Missing a piece of aluminum trim in the door, airbag light, TPMS light, brake light, belt light, but no CEL. Plugged in my OBD scanner and took it on a long test drive. No CEL and no one had reset the ECU for over 5k miles. Ran good. Idled far better than expected. Gears all good and clutch felt new. Engine showed signs of the OFHG leak but nothing else. Picked it up for $6,500. Took it home, and after a thorough cleaning, I was pretty shocked at the condition it was actually in.   Interior is in 9/10 condition. Outside of a split seam in the top back seat from the sun. The exterior though has less wear and tear than our my Odyssey with only 50k on it. The paint is in excellent condition and only has a couple tiny sized dings that can be removed with PDR. One rock ship in the paint on the hood. Anyway, on with the stuff I need to fix. Last edited by KnighTT; 07-09-2019 at 09:52 AM.. |
| 07-09-2019, 09:37 AM | #2 |
|
Captain
459
Rep 617
Posts |
 OK, now on to the things I have found we need to fix before we move on to modification. Maintenance before modification folks. So, she has a great idle. Even after sitting in emissions for an hour in line, she purred away as you would expect from a much younger girl. I did get some vibration/slight stutter under 50% throttle between 2k-3k rpm that did not fee motor related. That's when I went to look at the CV axles. I also got a limp mode warning and the 30FF right after emissions. So, knowing I needed to take care of a bunch of N54 things, and inspect, I got it up on stands and took a look over everything. - Index 12 injectors. SCORE! $1,500 I don't have to spend. - OFHG needs replaced. - Both front CV boots are torn, recently, and need replaced. That was pretty much all I found. The car has been well taken care of. So, in light of all of these other jobs, come the other jobs needing taken care of. -New CV seals. - Ordered all new seals for intercooler and chargepipe. - Throttle body gasket. - Intake manifold gasket. - Turbo inlet gaskets but turned out to be too big for some reason. Returning. - And all the stuff I need to clean the carbon out of the intake ports. ....the intake ports are the worst I have ever seen.  Some are worse. A few have 1/2" thick deposits and build up. I would venture to guess only 60% of the intended airflow is getting into the combustion chamber. So, we shall use this, some engine cleaning brushes with the drill, and brake clean for cleanup.  This is where we are now. OFHG and oil cooler gasket replaced. As well as the oil sensor and the alum bolts. FCP Euro sells an entire kit for about $50.  I'm also doing a full radiator flush. I really didn't get any oil when I drained the cooling, but there was some gunked up in the expansion tank. JUst went ahead and ordered a new exp tank as getting that gunk completely out of the nooks and crannies in the tank can almost be impossible. Last edited by KnighTT; 07-09-2019 at 09:53 AM.. |
| 07-09-2019, 09:41 AM | #3 |
|
Captain
459
Rep 617
Posts |
Now, after driving for a week....the stock shift knob had to go. It was far too tall and had too much of a plastic feel to the shift. It even flexed a little when shifting so it just felt like garbage.
This is a Cravenspeed knob made for a R56 Mini Cooper. I had one in my R53 a few years ago and really liked the feel of the shift. Dropped the knob probably 3"+ It's not "made" for the e92, but it ~fits as both shifters are BMW. It's weighted. A little over 300g I believe.  I also took the CDV off the transmission. Hopefully that will improve the shifting once I get it back on the road. And for giggles, I ordered a alcantara boot kit for the shiftier and brake. That'ss be here someday. I also ordered the missing aluminum trim for the driver side door from Latvia off ebay. $25. |
|
Appreciate
2
King Rudi13154.00 fastboatster378.50 |
| 07-09-2019, 09:47 AM | #4 |
|
Captain
459
Rep 617
Posts |
For the next few days I'll be working on getting the carbon out of the intake ports. I got one about 99% clean last night. It takes some work but it's much cheaper than walnut blasting.
The new CV axles don't arrive until Friday, so I'll get all of the other projects done between now and then. Once the axles go in, then we can troubleshoot the TPMS, the airbag lights, and put on the new brake pad wear sensors. I'll also reset all adaptations and see how the car drives. - The airbag/seatbelt light is most likely the pass side seat belt tensioner. If so, I'll just order a new one is reseating the connectors doesn't work. - Brake light is from the wear sensors. - TMPS needs reset. The aftermarket rims seems to have the TPMS sensors in them. - 30FF code will hopefully go away with all new outlet seals past the turbos and tighten everything up. - Then I have a adaptive lights warning to deal with. Anyway, more to come. |
|
Appreciate
1
cw09021199328is0.00 |
| 07-10-2019, 11:08 AM | #5 |
|
In The Lane Next To You
27
Rep 69
Posts |
Looks like you're off to a good start!
What OBD scanner are you using?
__________________
"The bitterness of poor quality remains long after the sweetness of a low price has been forgotten. There's nothing more expensive than a cheap BMW."
|
|
Appreciate
0
|
| 07-10-2019, 11:20 AM | #8 |
|
Captain
459
Rep 617
Posts |
THEY HAD 3 IN STOCK and tried to tell me they were super rare. Sure, the silver one with red interior was like 1 of 49 but the 335is is not fetching collectors prices. Sure they are rare-ish but are only worth KBB value at this point.
How can you sit on a car for 6 months and not even be interested in taking $1 off the price? They even tried to say they couldn't finance people from out of state. Too many red flags. |
|
Appreciate
0
|
| 07-10-2019, 12:21 PM | #9 |
|
Major

476
Rep 1,193
Posts |
Was initially going to go the 335is route until I saw how grossly overpriced they were at dealerships. Plus I wanted a 6 speed and a sedan so ended up in an e90 6 speed rwd for much less.
Great thread! Can't wait to follow along
__________________
2009 BMW 335i 6MT
*big single (eventually)* For now... MHD tuned VRSF Race IC DCI ATM exhaust |
|
Appreciate
0
|
| 07-11-2019, 07:24 AM | #10 |
|
Captain
459
Rep 617
Posts |
Before:
After:  Good eh? |
|
Appreciate
8
type-dRew641.00 MEN54236.00 Buug95917151.50 FimbulWinter27.00 san40k21.00 lab_rat394.50 cw09021199328is0.00 AWD Addict299.50 |
| 07-11-2019, 07:43 AM | #11 |
|
Captain
459
Rep 617
Posts |
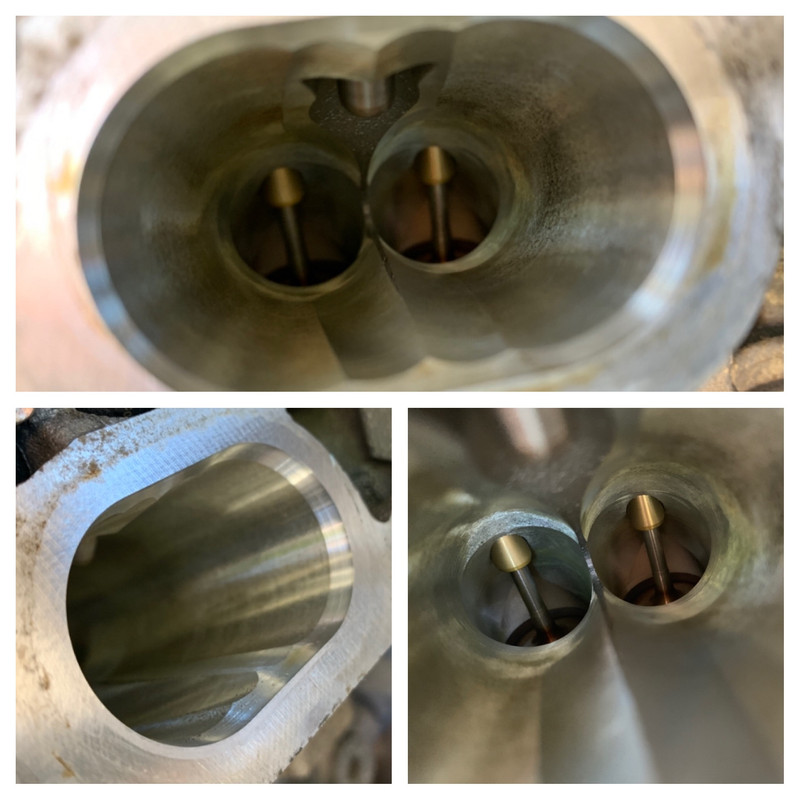
So, 5 out of the 6 intake valves are done cleaning.
To clean these, I use a cheap 90 degree drill and an engine cleaning brush kit installed in the drill with an extension. Using the steel brushes works best. Make sure each valve is completely closed before you work on an intake. - First, scrape as much built up gunk off the sides with a screwdriver and pic. Suck that out with a vac. (My intakes looked like a million year old cave. Stalactites and all. It was bad.) - Then use the steel brush to get the gunk built up off the sides of the outer walls but not the stuff around the valve just yet. Suck that out. - Then get your brake cleaner and spray the inside. Let a good amount pool up on each valve. Let that sit for a few minutes. - Now you are going to get your steel brush in there, high RPM, and just get all the surfaces you can. Left and right side of valve. All the walls. Run it for 2-3 minutes and get the entire intake. - Now suck that stuff out with your wet vac, turkey baster, etc. - Inspect your work and repeat step if you see stuff still built up on the walls. Don't worry about the stuff still on the valve and around the seat though. Gettign the big stuff off in the previous step is key. - Now is where the CRC Intake Valve cleaner really shines. Spray that all around the inside of the valves until the valves are submerged. It'll bubble up and have a chemical reaction. - Truth is, using CRC this way with a cold engine, this stuff needs to just sit. Hour +, overnight, etc. My two best valves that are 98% clean are the ones that I let that stuff sit overnight and I started again after work. - Now suck that stuff out and work on the fine details. You're never going to get it back to 100% but you can get 95-98% of that stuff out. - Use your pick, the valve cleaner, and an air gun to clean out the rest. Rinse repeat until happy. The steel brush is what gets the inside walls looking new in no time. A little brake cleaner and you'll see those shiny new walls in just a few minutes. My honest review on the CRC Intake Valve and Turbo cleaner? I think it WORKS. I think it is also formulated to work as directed. When the engine is heated up and this is slowly pushed into the system. Using it like a brake cleaner works but I am SURE using as directed will do exactly what it is meant to. I ordered 2 extra to run the cleanup job per the directions after the car is back up and running. I also think that doing this every 10k miles or so, and honestly a oil catch can, may severely cut down on carbon build up. May even make it a non-issue for 50-80k miles for some. Honestly, if you are a DIYr, this is a rather simple and extremely low cost alternative to walnut blasting. |
|
Appreciate
3
|
| 07-11-2019, 10:25 AM | #12 |
|
Captain
459
Rep 617
Posts |
Both Axles will arrive today. I picked up a pair of FEQ front axles from ECS. Honestly, I don't know how they are going to work out as feedback on these, and basically ANY new axles replacement is poor. If they turn out to be a POS over the next year, I'll have to move over to the GKN ones FCP sells for $$$. At least those will be lifetime warrantied.
Also, last week, when taking off the engine cover, I found that the ignition and injector wiring hardness had started to fall apart. This was due to spills and overfills from oil changes and the oil has caused the wires to come apart. A few of them had been attempted to be repaired but there is exposed wires and I'm just not going to take the chance of that causing a failure. Replacing the entire wiring harness back to the ECU for the ignition and injectors. I ordered a entire used engine wiring harness off ebay for $84. Arrived in great condition. So I'll be putting that on before she gets back on the road. That gives me a few spare harnesses just in case I ever have issues with the other two looms that come off the ECU. What a deal. I think after I get all of this done, over the next two weeks I'm going to do a full fluid change on the front and rear diff, the transfer case, and the manual trans. At 160k miles, I'm going to go for peace of mind on everything I can. |
|
Appreciate
1
type-dRew641.00 |
| 07-11-2019, 10:45 AM | #13 |
|
Major
1009
Rep 1,268
Posts |
I have an 07 335I MT, with 170K miles, you will need to look at all the rubber in the suspension. I did a marathon maintenance on my car this last winter. The car was down for couple of week as I fix all the oil leaks (except oil pan), clean intact ports (3rd cleaning) mind looked like yours but I walnut blasted them, changed plugs, and coils (original), change front and rear shocks, fixed various broken plastic part under the hood. I am starting to notice the suspension if getting sloppy and vibration, looks like most of the rubber is shot or very close to being toast. I would advise looking at all those parts as well.
|
|
Appreciate
0
|
| 07-12-2019, 03:30 AM | #14 | |
|
In The Lane Next To You
27
Rep 69
Posts |
Quote:
__________________
"The bitterness of poor quality remains long after the sweetness of a low price has been forgotten. There's nothing more expensive than a cheap BMW."
|
|
|
Appreciate
1
boeryan0.00 |
| 07-12-2019, 07:05 AM | #15 |
|
Captain
459
Rep 617
Posts |
This is the one I picked up off Amazon. Bunch of reviews from guys who use MHD.
Worked as expected. $27.99 https://www.amazon.com/gp/product/B0...?ie=UTF8&psc=1 |
|
Appreciate
0
|
| 07-12-2019, 08:16 AM | #16 | |
|
Lieutenant
236
Rep 481
Posts |
Quote:
Thanks for info, when you say "Make sure each valve is completely closed before you work on an intake. ", what do you mean by closing each valve, how do you close them? |
|
|
Appreciate
0
|
| 07-12-2019, 09:19 AM | #18 |
|
Captain
459
Rep 617
Posts |
CV axles came in and a few other parts.
The outer CVs are just so stiff. I guess after some Googling, that's a normal thing. Maybe I'm just paranoid these axles are junk. So much to do this weekend so I can get this thing back on the road by Monday. Sounds like a beer run is in order. |
|
Appreciate
0
|
| 07-12-2019, 08:37 PM | #21 | |
|
Colonel
 3761
Rep 2,738
Posts |
Quote:
__________________
|
|
|
Appreciate
0
|
| 07-14-2019, 02:01 PM | #22 | ||
|
Captain
433
Rep 780
Posts |
Quote:
Quote:
From my reading typically high mileage N54s can expect failure of the pcv system from the channels in the cover being clogged. His system externalizes it. I was on a tight budget when I did my rebuild so I saved the $150 for the catch can and ran without it for a short while. With out the CC the functionality is basically the same as stock, but actually functional. Then when I get the CC I'll just put it inline in the hose. Side note on the valve cleaning you can build your own kit for about $100 at harbor freight and some DIY. |
||
 |
| Bookmarks |
| Thread Tools | Search this Thread |
|
|


