

|
|
|
|
 |
|
 |
BMW Garage | BMW Meets | Register | Today's Posts | Search |
 |

|
BMW 3-Series (E90 E92) Forum
>
DIY: Aluminum Pedal install how-to
|
 |
| 06-18-2005, 09:52 PM | #1 |
|
Captain
 44
Rep 722
Posts |
Ok, I had a bit of a trial by fire, but I did learn a few things.
You will need a 5/32nds drill bit, preferably a cobalt one, since the brake pedal is steel. You will also need a 9/64ths (or even smaller) drill bit for the set screws used on the gas pedal and dead pedal. I also used some masking tape and a clamp. You will also need a #15 torx driver (just like a screwdriver, but with a star end). A shorter torx screwdriver is best. You will also need a pair of needle nose pliers or a small socket wrench with the correct size socket for the nut. (Don't remember which size though). Use eye protection when drilling. First, I removed the rubber pedal pads from the brake and clutch pedals. (There is nothing to remove from the gas pedal and dead pedal). Then I put masking tape over the pedals to mark the holes. The kit provides paper templates, but they were kind of flimsy and move around too easily. Next, I put the aluminum pedals over the existing pedals and marked the hole locations with a marker. Then I used an awl to punch starter holes in the plastic pedals. I used a soup can under the brake pedal to give me some support when tapping starter holes with the awl. I started with the clutch pedal. After I drilled the first hole, I put a screw through the hole to hold the aluminum piece in place better while I drilled the rest of the holes. Just add a screw after each hole is drilled and this will keep the aluminum pedal in place and you will get the rest of the holes perfect. The plastic pedals are easy to drill. Since the brake pedal is steel, it's quite a bit harder. Make sure you get the first hole in the right spot. Then use a screw through the first hole, and a light clamp to keep the pedal in place while you drill the next hole. Be careful not to mar the surface of the aluminum with a clamp though. A rag or a few layers of tape between the clamp and the aluminum will help. Then keep adding screws as you drill the rest of the holes and this will keep the drill from "walking" as you drill. Next, remove the screws and aluminum pieces and remove the masking tape. Put the rubber inserts in place on the aluminum pieces, and replace them on the pedals. Then put the machine screws in place and secure them with the nuts. Tighten them securely, but don't overtighten too much or the plastic pedals may crack. I did the gas and dead pedal last. Use the set screws for these. They bite right into the plastic and require a smaller hole than the rest of the pedals. A 9/64ths bit or smaller is good for these holes. One thing I will say is MAKE SURE you use the set screws that bite into the plastic for the gas pedal, not the machine screws that use nuts. The machine screws with nuts are too long and will prevent you from getting full throttle unless you file them down. There are no instructions with the kit, and if you drill holes in the gas pedal big enough for the machine screws, the holes will be too big for you to use the set screws that bite into the plastic. Use the smaller 9/64 drill bit (or even smaller) for these holes. They kit provides at least 4 extra machine screws and nuts, and I ended up using the wrong ones. After I was finished I noticed 4 extra set screws... Oops. I noticed that the screws and nuts on the back prevented full throttle. I had to file the screws down and that took care of it, but it was as pain! The dead pedal uses the set screws too, and the aluminum piece goes right on top of the existing plastic dead pedal. The set screws at the top of the dead pedal were hard to get at, as they are pretty high up, and the dash gets in the way. You may not be able to pre-drill them at all. This is why I recommend a shorter torx driver. It's hard to fit a drill up there and I just ended up pushing hard without predrilling and the screws managed to bite in and self tap. Hopefully this will help the rest of you save some time doing the install. Have fun! 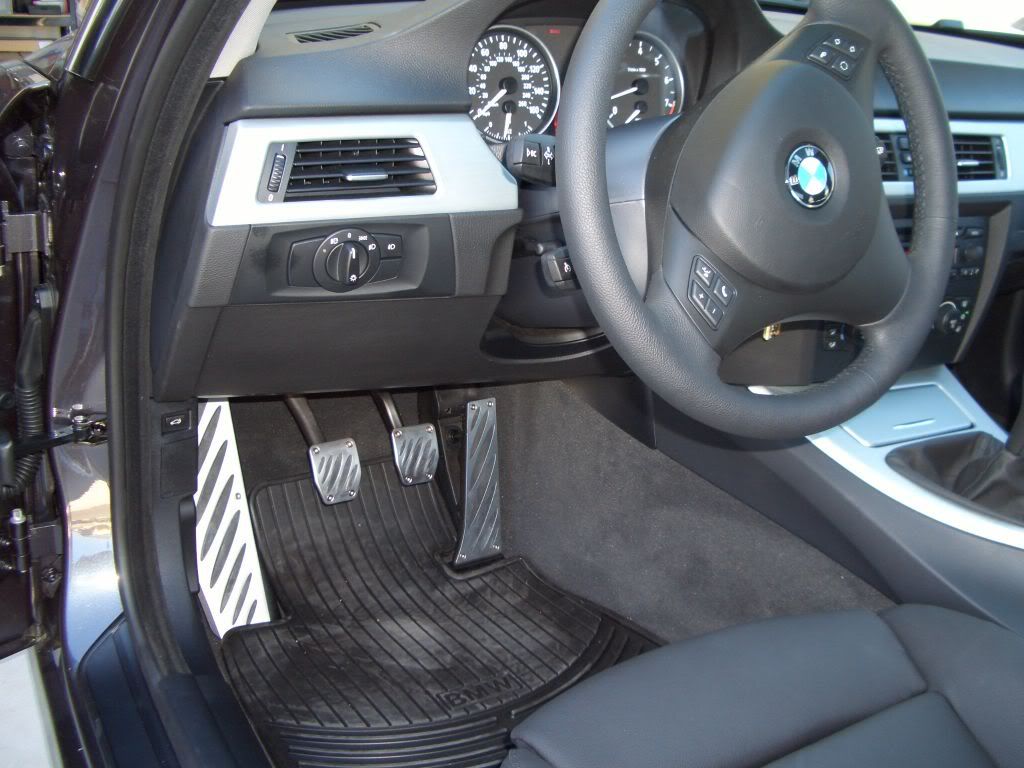 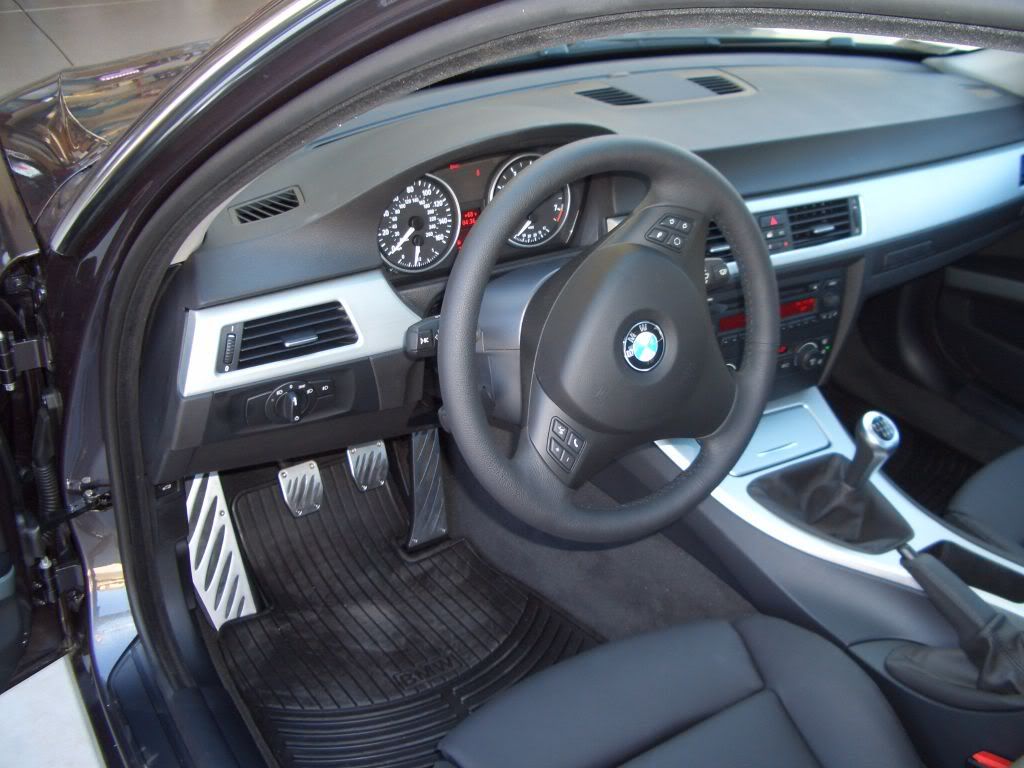  |
| 06-18-2005, 09:56 PM | #2 |
|
Captain

96
Rep 649
Posts
Drives: 2006 BMW 325i
Join Date: May 2005
Location: Texas
|
Thanks for everything. This would make for a great contribution in the DIY sticky.
|
|
Appreciate
0
|
| 09-17-2005, 02:35 PM | #3 |
|
Lieutenant
134
Rep 463
Posts |
Thanks for the great write up!!! I made sure I used the correct screws for the accelerator pedal.
Everything went pretty smoothly except the brake pedal. Let me say that drilling through the metal was a PAIN IN THE A$$. :mad: This is coming from someone who's day job is drilling all day long (I am a dentist). Anyone considering the aluminum pedal installation, go ahead and get them! It looks amazing and feels great on your feet. Just be a little patient with the break pedal installation!!!  |
|
Appreciate
0
|
| 09-30-2005, 12:49 AM | #5 |
|
Second Lieutenant
7
Rep 244
Posts |
We'll I could not wait till weekend so I went home early and did it...The brake pedal install was really the bear to drill. Definitely not for the faint of heart...The holes on the top of the footrest, I was only able to put in one. It was hard to put in....I might have to jury rig the other one.
But overall, I'm satisfied....It definitely changed the inside of my e90. With a new MT weighted short knob, and alum pedals...definitely more sportier look. |
|
Appreciate
0
|
| 10-11-2005, 09:41 AM | #7 |
|
Lieutenant
12
Rep 456
Posts
Drives: X3 + 325xi
Join Date: Jul 2005
Location: New Jerz
|
Great instructions.....top screws of dead pedal are a !@#$@@. Here are some pics if anyone wants to see it on a silver/aluminum/grey leather combo.....
|
|
Appreciate
0
|
| 10-11-2005, 09:52 AM | #8 |
|
Major General
 
364
Rep 5,842
Posts
Drives: 2006 325xi
Join Date: Aug 2005
Location: South Central Connecticut
|
i just got mine installed as well. thanks for the write-ups, they saved a lot of time. i didnt know the break pedal was steal though - that was a pain in the a$$ to drill through. otherwise it looks awesome. the Rear Spoiler is next...
|
|
Appreciate
0
|
| 12-25-2005, 10:04 AM | #13 |
|
I'm Starving , So I Guess You Are What You Eat
229
Rep 943
Posts |
i dont feel like drilling, nor do i have a drill. should i just take them to bmw? whats it gonna cost to have them installed? thanks
__________________
2006 325i Sparkling Graphite Metallic-Black Leatherette
Navigation-Bmw Assist Automatic-Xenons Carbon Fiber Front Lips-Aluminum Pedals Power/heated Front Seats 5% Tint all around 30% On windshield all the way down |
|
Appreciate
0
|
| 12-25-2005, 11:32 AM | #14 | |
|
Captain
34
Rep 713
Posts
Drives: '06 E90 - '04 E85 - '16 F15d
Join Date: May 2005
Location: Escondido, CA
|
Quote:
Floor Mats All Weather Rubber Custom-fit rubber mats feature 1/2" deep channels to trap water, slush, snow and dirt. Will not crack, curl or stiffen in any temperature. With mat grip fasteners to hold them in place. Part No. Specs. 82-55-0-399-156 Front, black. 82-55-0-399-157 Front, beige. 82-55-0-399-158 Front, gray. 82-55-0-399-217 Rear, black. 82-55-0-399-218 Rear, beige. 82-55-0-399-219 Rear, gray. http://pacificbmw.com/ prices are pretty good on accessories.
__________________
 |
|
|
Appreciate
0
|
| 07-02-2006, 12:32 AM | #17 | |
|
Banned
240
Rep 2,453
Posts |
Quote:
|
|
|
Appreciate
0
|
| 11-13-2006, 06:13 PM | #18 |
|
Colonel
 
375
Rep 2,348
Posts |
Don't have the drills and don't wanna try risking it myself cause haven't held a drill befire in my life. Therefore i wanna ask if it's possible for BMW to help me install them and how much would you think it'll cost?
BTW mine is not BMW factory pedals, i got them of bavauto (Hamann) and would they still do it if it's not their factory pedals?
__________________
  |
|
Appreciate
0
|
| 11-13-2006, 06:35 PM | #19 |
|
Lieutenant Colonel

302
Rep 1,928
Posts
Drives: had e90, 330i mystic blue
Join Date: May 2006
Location: Weston,Florida
|
that was my 1st aftermarket part that I got for my car
 I have the ACS and yeap is a pain in the ass to do the brake pedal !!! wuufer001 the dealer will do it for you they will charge you an hour of labor, do it yourself is not hard at all or at least do the other ones and ask the dealer to do the brake pedal that is the harder one! maybe they are cool and don't charge you anything or at least not much. or go to one of the tech guys and tell them "I give you $20 cash if you install the brake pedal for me I allready did the other ones "
__________________
E90 Mytic Blue 330i 07-20-2006. 05-17-2011
Doesn't the idea of making nature against the law seem to you a bit . . . unnatural? Support NORML  |
|
Appreciate
0
|
| 11-14-2006, 01:34 AM | #20 |
|
Colonel
375
Rep 2,348
Posts |
thanks, might take it with me and see what they say when i take my car in for service tomorow.
BTW will they do this at the service department or will they have to take it to the bodywerks?
__________________
Last edited by wuufer001; 11-14-2006 at 01:56 AM.. |
|
Appreciate
0
|
| 01-07-2007, 09:16 AM | #21 | |
|
Enlisted Member
 2
Rep 37
Posts |
Quote:
__________________
2007 325i
2006 E55 AMG 2003 325Ci 1983 911 |
|
|
Appreciate
0
|
| 01-07-2007, 12:02 PM | #22 | |
|
Second Lieutenant
13
Rep 247
Posts |
Quote:
__________________
2007 335i Coupe  |
|
|
Appreciate
0
|
 |
| Bookmarks |
|
|


